Friday, January 27, 2012

COOKING: Mini Three Tiered Cakes

I tried my hand at mini wedding cakes again. This was mainly to use up the rest of my buttercream I had. Then after I baked the cakes, I realized that because of the lack of crisco (replaced with butter), that it didn't hold up very well and was incapable to being piped, especially into drop lines, which was what I had intended.

So, I switched gears and decided to experiment with fondant. Something that Buddy Valastro does often is drape fanned fondant. This is particularly hard to do on a mini cake, as fondant, no matter how thinly rolled, is quite heavy when it's folded, and the mini cakes had little shelf to offer support. It still managed to work though.

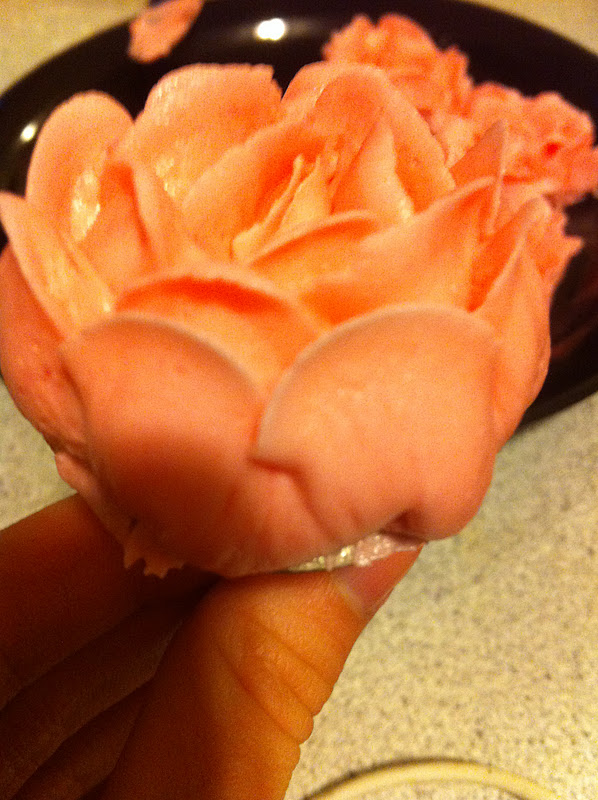
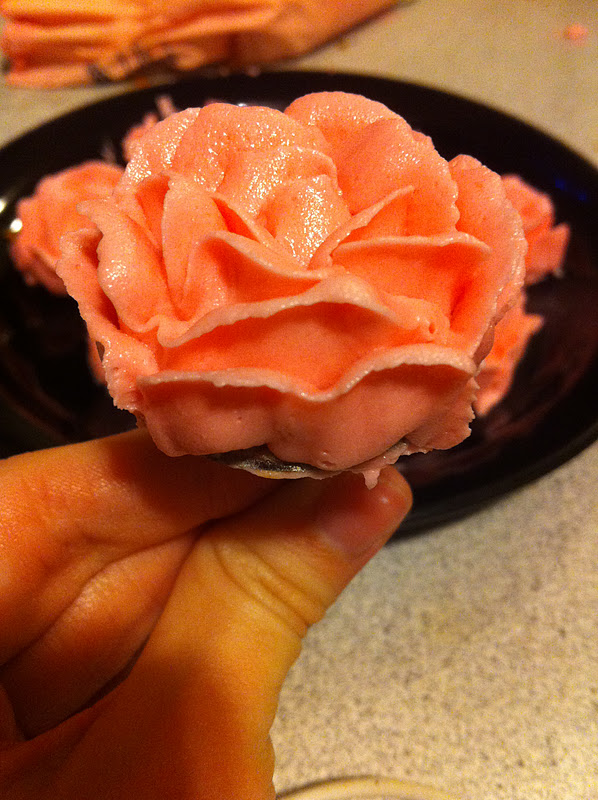
I also tried a fondant rose. Normally sculptures are made from modeling chocolate (and now I understand why) but I've heard of some using fondant. I wouldn't recommend it, but it worked out ok once it had time it harden.

I also tried out making same sized pearls, as I'll be using these next month. That was pretty easy, but I had to resist the temptation to use my luster dust on them!

The second cake was done very quickly. I had a baby crying, two dogs underfoot, and my fondant was trying to harden. So it looks pretty terrible, but understanding how to marble and stripe fondant with other colors was worth it. And I practiced braiding.

Here's the mini cakes:


Wednesday, January 25, 2012

CRAFT: Fleece hat

It took me all of five minutes to make Katie a fleece hat today. She keeps losing and misplacing (yes, I said SHE does!) all of her hats, and baby hats are really expensive! So when I was going through my "to upcycle" trashbag of clothing and found a super soft fleece sweater that I knew would be used in some way for Katie, I decided to start it off with making her a hat. I lobbed off half of one sleeve, made sure the hemmed side fit her head, then tied a knot in it about two inches from the unhemmed side. Once the knot was really tight, I put a few stitches in, then took a scissors and chunky frayed the ends so it would look like a fleece pom pom on top. That was it!

Here's K.B. modeling it:


Monday, January 23, 2012

CRAFTS: Doggy Sweater Tut

Today I made a very simple but effective doggy sweater! On a site I'm on, someone was asking about how to make them so I figured I'd do a step by step tut for it.

Doggy Sweater Tut:

I've been filling a trash bag full of clothing to upcycle, so I had the perfect housecoat to use. It was dark brown and quilted on the outside, had a layer of batting on the inside, and dark grey fleece on the other side.


Step One was cutting off one arm of the coat. This dog needed a 15 inch length sweater, so I cut off 16.


The shoulder portion was round, and would be used towards the tail of the dog. Both ends were hemmed, but in the middle I left an unhemmed space of about an inch.


Step Three was cutting down the middle of the underbelly part. Then, return to the original jacket and cut down the length of the buttons to fit agianst the fabric that was just cut. This jacket had snaps, which is much easier than buttons when putting onto a dog!


Putting the right sides together, sew one of the button panels to one side of the sweater. Sew one inch at the top and two or three inches at the bottom. Leave the middle portion open. Repeat for the other side.


At this point, I stopped and made sure the leg holes were in the right postition for the dog. Then, I hemmed up the leg holes.

That was it! It took me less than an hour to hand stitch the whole thing while making a dinner of Chicken Fetticini and Alfredo and entertaining a baby at the same time.


And here's Bandit modeling it:


This project cost me $0 and was super easy!

Wednesday, January 18, 2012

COOKING: Icing Roses

I'm desperately trying to do roses professionally. The first time I tried them, it ended in tears. I then realized that the tip was pinched and thats why the icing kept coming out screwy and ruining my roses. I've since cleaned out my baking drawers and realized that I had another rose tip. So I tried again. I call these my real first attempt (they look plenty amature ro fit the name anyway!)

I really want to improve quickly, as I plan to make a Valentine's cake with a bottom rose border and a cake for our wedding blessing with red roses. I have about three weeks until Valentines Day to get these right!

Note: the actual color of the roses is a light pink. Not the weird peachy flesh color in the pictures!


All together: I picked them off the rose nail with a butter knife.
NOT A GOOD IDEA! But I was in a hurry.